
Reader Sean's desktop proves that Linux can be bright, colorful, and geeky all at the same time—there's no reason to be stuck with brown. Hit the link for the full explanation and a link to download all of the Conky configuration files used to generate this theme. Great job, Sean! Want to see your own desktop featured here?
Read up on how to customize Conky for ambient Linux productivity, and then post your productive desktop over in the Lifehacker Desktop Show and Tell Flickr Group complete with a description of the programs and tweaks you used (and preferably links as well!), and we just might feature it here.
via[SeanKelly's Page]via[LifeHacker]
 Click Here to Read More..

Ubuntu-Desk-Top. This style can be created with afew tweaks to your desktop. To get the exact look-and-feel, you must have the Ubuntu-Desk-Top wallpaper I designed exclusively for my ubuntu desktop. Get the Wallpaper Here..
I have used conky to print out system stats and weather on the notebook Just below that, conky prints out my unread emails on an envolope, following the system date and Calendar. To get the exact look, you'll need the customized conky script here.
Hand watch displays current time (note that its not just an image, I have used MacSlow's cairo-clock to look like a watch).
Use AWN or any other docks, make it's theme transparent. Download and assign Color-Stroked hand drawn icon set I designed for this style. (Photograph, notebook-Links, Coffee-Break Links directs to relevant apps and folders). For this, you can download and edit the PSD files here.
I still haven't got the audio player (zune on Desk-Top) to work. However, if we call in amarok (my fav audio player) using conky, its all done.
stocks, DV and sxc.hu
full view at my devianART>>>
Click Here to Read More..

Who said you can’t Photoshop? Try my tutorial on how to create a Stunning 3D floral patterned text effect in less than 15 minutes. It’s easy and simple.
Ingredients:
Photoshop CS2 or later
3D text rendering software.
1600×1200px blank canvas
Step 1: First, Pickup the Gradient tool(G) , choose Radial Gradient and fill the background of the canvas with desired colors. For me, I chose White as foreground and Bright Green as background Color.

Step 2: We’ll need something written in 3D. We have two possible variations: You can either use the “Extrude and Bevel” in illustrator or Xara3D to create the 3D text.

Step 3: Copy the 3D text to PS and rename layer as “3D Text”. Then, rotate, adjust the letters to your desire and balance the color.

Step 4: With me so far? Now make a new layer “floral” above the 3d text, and using any floral brush set, paint on that layer.
Step 5: Now add fx(Style[Inner Shadow], Blend Mode[normal], Opacity[100], Angel[90], UseGlobalLight[yes], Distance[2], Choke[5], Size[1]); to the “floral layer”.

Step 6: Next, using Magic wand tool, select the outer layer of the 3D text layer and delete the selection after choosing the floral layer.
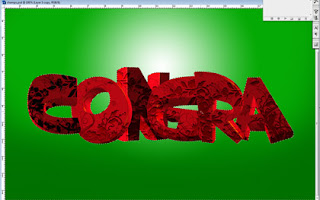
Step 7: Now add extra effects to splendor your work. These effects aren't needed, but they provide nice details to the final product. Now that we have the basic 3D floral text effect, we can add more effects to give it a reflection, and an environment.
Click Here to Read More..

Ok here is a really cool post you do not want to miss. Using just a Cardboard Box, a low cost Webcam, a Piece of Clear Flat Sturdy Material and a paper, build your own multi touch pad in less than 5 minutes. So how does this work;
It’s really easy and simple. It handles tracking blobs of infrared light, and sends your programs these multi-touch events, such as 'finger down', 'finger moved', and 'finger released'. It includes a configuration app and a few demos to get you started, and will interace with most types of webcams and video capture devices. It currently works only under Windows but efforts are being made to port it to other platforms.
See the video demonstration>>Visit Touchlib Website>>
Click Here to Read More..

This is just one of the MANY ways you could do a speed painting. This way doesn't give such a smooth effect sometimes, but it's the best way to get started. Conversely, always remember to work with lots of references or your painting might end up junk. Also remember to work on grids and multi layers unless you are confident enough not to mess-up your work. I’m not sure if I’m explaining, am I? :D ok ok, Don’t worry guys. Once I’m done with my annoying US history Assignment, I’ll upload a full Tut explaining this in detail. So keep in touch.
Click either on this link or on the preview image to see the animated WIP>>
Click Here to Read More..


 Click Here to Read More..


